I've been asked by a few people if I would do a post on my technique for basing my naps so here it is and I hope it is of some interest and maybe of some help?
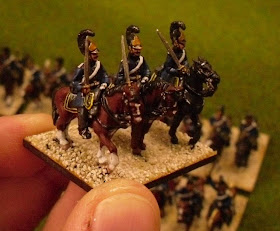
This is how my Silesian kurassiers looked after I added the flag and finished highlighting them. They are mounted on 36mm by 30mm laser cut bases from warbases in Dunfermline. Laser cut bases are the best I have found for basing our naps and are a huge step forward from our original hand cut and regular machine cut bases.
The troops still look pretty glossy from the Army Painter coat at this point. I attached the figures with super glue and they are now ready for the ground work.
I apply PVA white glue neat to the base and then dip the base in a box of gravel I prepared. It's made up of golf bunker sand and a heavier grade of grit from a railway modelling shop.
I shake off the excess grit and move onto the next base giving each 1 a few minutes to dry a little.
Next I use a modelling tool to clean the grit away from the figures.
Now the PVA glue is dry and the bases are ready for the most important stage. Also by this stage I have coated the bottom of each base with an acrylic oak varnish and attached magnets to prevent movement in their storage trays.
I now dilute the PVA glue and give each base a full coat. The great thing with the diluted PVA is that when it dries it contracted and disappears leaving a nice coat over the grit and doesn't harm the figures. I feel this stage is really important as when it comes to painting the base the sand/grit stays in place and when the basing is finished there won't be any bits falling off.
The diluted PVA needs to be really thin like the consistency of milk to flow around the grit.
The whole process takes roughly 20 to 25 minutes and then I leave then to dry over night.
I then apply a coat of Citadel graveyard earth trying to avoid getting paint on the figures. Any earth brown will do, graveyard earth is just the 1 we've been using for years.
I then give the grit a soft dry brush with bleached bone, again trying to avoid getting paint on the figures. Once your finished have a look for any areas you may need to tidy up. I then varnish the figures with Revell enamel matt varnish no.2 (not Humbrol as it is unpredictable and can cause frosting). The finishing touch is to paint the edges of the bases with an oak varnish (any coloured varnish will do).
Once the edges are totally dry I apply PVA neat in selected areas around the base and then shoot static grass summer mix at the base from an old plastic fairy liquid bottle (this is a perfect match for GW battle mat!). I then move onto the next base and when that's done I tap off the excess grass from the previous base into the plastic tub and so on. The fairy liquid bottle is a trick I picked up from some modelling buddies that really helps the grass to stand up on the base.
Before the PVA glue is totally dry I clean round the hooves of the figures with my modelling tool and make sure that the grass is away from the edge of the bases.
And that's them all finished!


