
I've been asked by a few people if I would do a post on my technique for basing my naps so here it is and I hope it is of some interest and maybe of some help?

This is how my Silesian kurassiers looked after I added the flag and finished highlighting them. They are mounted on 36mm by 30mm laser cut bases from warbases in Dunfermline. Laser cut bases are the best I have found for basing our naps and are a huge step forward from our original hand cut and regular machine cut bases.

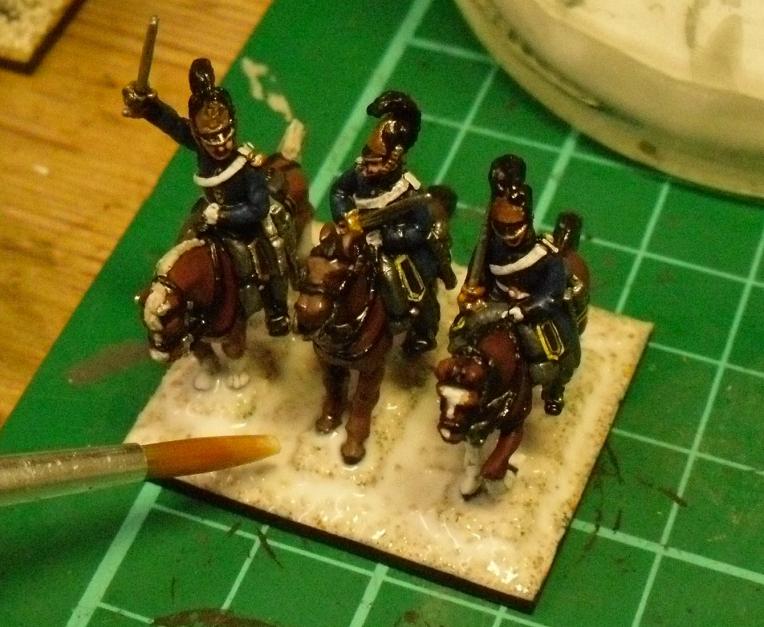
The troops still look pretty glossy from the Army Painter coat at this point. I attached the figures with super glue and they are now ready for the ground work.

I apply PVA white glue neat to the base and then dip the base in a box of gravel I prepared. It's made up of golf bunker sand and a heavier grade of grit from a railway modelling shop.

I shake off the excess grit and move onto the next base giving each 1 a few minutes to dry a little.

Next I use a modelling tool to clean the grit away from the figures.

Now the PVA glue is dry and the bases are ready for the most important stage. Also by this stage I have coated the bottom of each base with an acrylic oak varnish and attached magnets to prevent movement in their storage trays.
I now dilute the PVA glue and give each base a full coat. The great thing with the diluted PVA is that when it dries it contracted and disappears leaving a nice coat over the grit and doesn't harm the figures. I feel this stage is really important as when it comes to painting the base the sand/grit stays in place and when the basing is finished there won't be any bits falling off.

The diluted PVA needs to be really thin like the consistency of milk to flow around the grit.

The whole process takes roughly 20 to 25 minutes and then I leave then to dry over night.

I then apply a coat of Citadel graveyard earth trying to avoid getting paint on the figures. Any earth brown will do, graveyard earth is just the 1 we've been using for years.

I then give the grit a soft dry brush with bleached bone, again trying to avoid getting paint on the figures. Once your finished have a look for any areas you may need to tidy up. I then varnish the figures with Revell enamel matt varnish no.2 (not Humbrol as it is unpredictable and can cause frosting). The finishing touch is to paint the edges of the bases with an oak varnish (any coloured varnish will do).

Once the edges are totally dry I apply PVA neat in selected areas around the base and then shoot static grass summer mix at the base from an old plastic fairy liquid bottle (this is a perfect match for GW battle mat!). I then move onto the next base and when that's done I tap off the excess grass from the previous base into the plastic tub and so on. The fairy liquid bottle is a trick I picked up from some modelling buddies that really helps the grass to stand up on the base.

Before the PVA glue is totally dry I clean round the hooves of the figures with my modelling tool and make sure that the grass is away from the edge of the bases.

And that's them all finished!
31 comments:
Hi Paul,
Very useful guidance. Which acrylic oak varnish do you use as I've had bad experiences using that type of varnish and would appreciate the tip.
Cheers
Greg
Simple and beautiful...Great work!
Phil.
Paul,
Just about the same way I do my bases. But for some reason your grass comes out much better.
Thanks for the comments guys!
Hi Greg,
I use a basic instore Homebase Oak varnish that is water based. It doesn't look like much when you open it but it lasts for a long time and a few coats do the job.
Hi Phil,
I try to keep it as simple as possible to save time and effort ;0)
Hi John,
I have no idea about hte grass, I remember you metioned it before. Maybe a different manufacturer of the grass? There is a definite difference from when I started using the squeezy bottle though.
Cheers
Paul
Nice work Paul...very well said and very well done
Ii love your basing Paul. It's just right for 15mm.
Best wishes
Giles
Paul,
Probably the grass as I use almost the same type of squeeze bottle.
You should list the manufacturor of the grass amd the size also. My problem might be I use a shorter grass lenghth than you also.
Ok John I'll check that out, I never even thought of the different size of grass etc
Cheers
Paul
Hello,
Yes, they look splendid. I've always been on the fence about the gravel look as it would seem to me that most of the fighting would be on the plains or fields where grass would be more common than gravel. Of course, they look so nice with gravel it is only a matter of taste in the end.
Are your stands magnetized?
Looks great, and a fine tutorial although I still think more trouble than I personally want to go through for ordinary units... rather spend the time painting still more troops instead of basing! :-)
Whatever on earth is "Fairy Liquid", LOL!
Peter
My wife thought I was mad when she saw me trimming the grass on one of my bases with my electric nasal hair trimmer - well, she's right, isn't she?
Davy
P.S. Peter. Fairy Liquid is a UK dish washing detergent.
Thanks for all the great comments guys!!!
Yeah we add magnets to our bases and steel sheet in the boxes. Perfect for storing them safely.
A great write up, that's basically what I do! Great minds eh?
thanks Ray!
With the gravel I think it just adds a little something instead of all grass?
Cheers
Paul
Hi James,
Sorry I deleted your comment and question by accident. I was deleting the spam on my mobile and my fat fingers deleted your comment by mistake!!!
The magnet sheet we use we buy from Trevor at Magnetic Displays trevor@magneticdisplays.co.uk
We also buy steel paper to line our plastic A4 boxes there. Both are easy to cut with scissors and have an adhesive back.
Cheers
Paul
Paul,
Thanks - timely guidance as I'm just about to embark on rebasing my 2,000+ French and Prussians that were based for Empire years ago and which I now want to use for Age of Eagles. Nice tip about the Fairy Liquid bottle!
I've got a couple of questions - I see that you use Army Painter shading. I've never used it but am considering using it for some Austrians. Which shade do you use? Any advice on using it?
Second quetsion is more of a comment. I also use magnetic basing but the other way round. My troops are based on Ian Carbutt's steel bases and my boxes are lined with magnetic sheet. This way I get thinner bases on the table top and the same pretection while travelling. Ever tried it?
Many Thanks
Paddy
Hi Paddy,
Glad you found the post interesting.
The AP shade I use is Dark tone (the darkest). I found the other shades to subtle. With Austrians I spray them white then block everything else in. Paint everything and don't leave any gaps in the painting. If the buttons are raised paint them in as the AP brings them out well.
I always brush paint it on and don't let it pool on the figures around feet, under trousers and in elbows. I found it works really well on white however a couple of people I know felt it was to dark.
The trick is in the highlighting and planning the colours you want to use for facings and backpacks etc.
With the magnets never thought of doing it the other way as I haven't seen steel bases before? both the steel sheet and magnet is the same thickness here. My buddy keeps his figures in steel tool boxes so the magnet goes onto the figures. I guess this is part of our thinking, if we ever wish to keep them in tool boxes although both ways make total sense.
Hope I've been of some help
Cheers
Paul
Also Paddy I meant to mention part of getting the AP to work well is keeping the painting neat and blocking in well, especially if using a white undercoat.
My brother David found this out with his 1st 28mm French. He didn't totally paint right up to each colour and when the AP was applied some of the undercoat showed through. It put him off for a while. He changed his painting method by blocking in all the colours and covering the undercoat and it worked 100% better!
Cheers
Paul
Paul,
Thanks - that is what I was thinking - but your confirmation will give me the courage to try AP Dark Shade. I'll let you know how it goes.
I can't speak highly enough about using steel bases. Once I found them I won't use anything else. Best think is the "heft" they give the troops and the protection they afford. Look at them here (I've got no association with them etc.): http://www.freewebs.com/pwsltd/steelbases.htm
Paddy
will be using this technique on my next project, "Custer's Wolverine Brigade for Johnny Reb". a new opponent for your brothers David's Conferates.
Hi Paddy,
I checked out the steel bases.
They do look good and sturdy but I think I'll stick with the MDF laser cut with strips of magnet attached. It meets our own needs as we have made up plenty of boxes for them.
I'll maybe consider them for another project though.
Cheers
Paul
thanks for that Paul, I got some bases from Warbases (love the smell of them) and just ordered a few magnetic sheets. Do you have any problems getting the figures to stick to the bases? Been using super glue and seem to have a lot coming off, probably me or cheap glue. I've got a French, British and Russian army to re-base plus an Austrian army I've just started painting plus a load of Dutch Belgians, French, and Russians (should keep me busy until about 2020). Might even get round to the Prussians one day. Cheers, jamie
Hi Jamie,
If your in the UK order this stuff:
http://www.ebay.co.uk/itm/SUPERGLUE-SUPER-GLUE-20g-INDUSTRIAL-STRENGTH-STANDARD-VISCOSITY-/220946546258?pt=UK_Body_Shop_Supplies_Paint&hash=item337170be52
This is the best Super glue I have ever found, my brother David and I use it all the time. It sticks our paper clip flag poles in place and is liquid so is perfect for conversion and is glued in seconds. It is also brilliant for sticking metal to MDF bases! I have been building model kits all my life !/72 scale ww2 and have tried so many brands but this os by far the best!!!
No connection to the seller :0)
Looking forward to seeing your rebased figs!
Best
Paul
Hi all, I know this is late but I just use no nails? The cheap stuff from homebase. Smooth it around the base of the figure. Once set move on to the gravel.
Nice, Paul. I've been laying low for a while, but nice to see you up and posting!
How thick are your bases in mm?
2mm
Missed this post Mark sorry buddy
the bases from where you buy them? thanks
Hello the bases are from warbases in Scotland.
Post a Comment